
Napkin folding as we know it dates back to the 16th century, and since that time a carefully folded napkin at a table setting has been the indicator of elegance, class, and superior level of care and attention to detail. Taking the time to fold your napkins, transforming something otherwise utilitarian into a work of art, shows your guests that you care enough to ensure every detail is perfection. While there are hundreds of intricate napkin folds out there to learn, you don’t have to be a master napkin origamist to include this elegant art form in your event. Try mastering these 8 simple napkin folds with paper or cloth napkins at home so you are ready to impress at your next event!
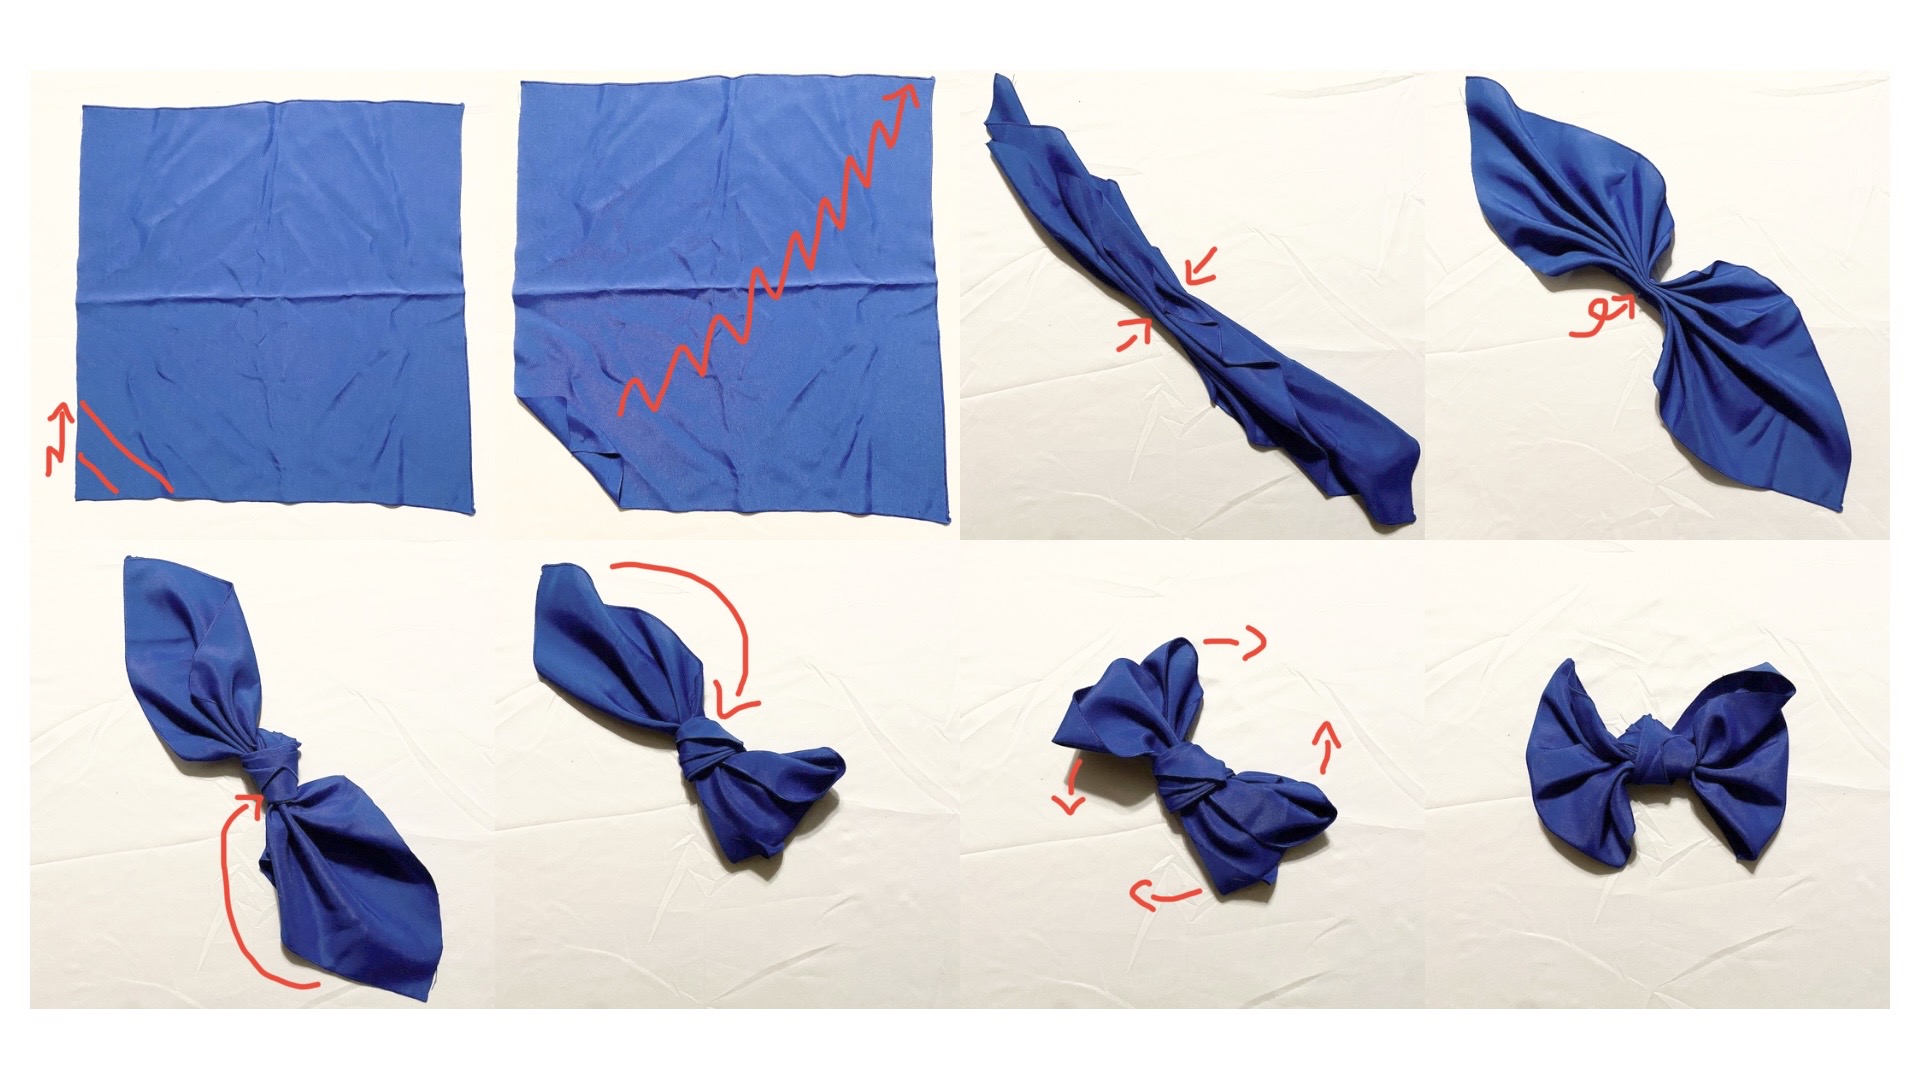
Bow

- Starting from a corner, pleat the napkin, folding it back and forth until you reach the opposite corner.
- Holding the pleats together in the center, carefully tie a knot. It is ok if the tails start to unfold.
- Pick one side of the knot to be at the front of the bow. Turn the napkin around so the back is facing up.
- Tuck the tails of the napkin into the back of the knot, creating two loops.
- Turn the napkin over so the front is face up, then gently fluff the two loops to create an easy napkin bow.
Ribbon
- Just as with the bow, begin creating the ribbon by pleating the napkin from one corner to the other.
- Holding the pleats together in the center, carefully tie a knot. You can tie the knot off center to customize the length of the ribbon’s tail.
- Pick one side of the knot to be at the front of the ribbon. Turn the napkin around so the back is facing up.
- Identify a horizontal loop at the back of the knot and thread the shorter tail through it, pulling it tight against the back of the longer tail and hiding it from the front.
- Flip the napkin to the front and fluff the knot and longer tail as needed.
Rose
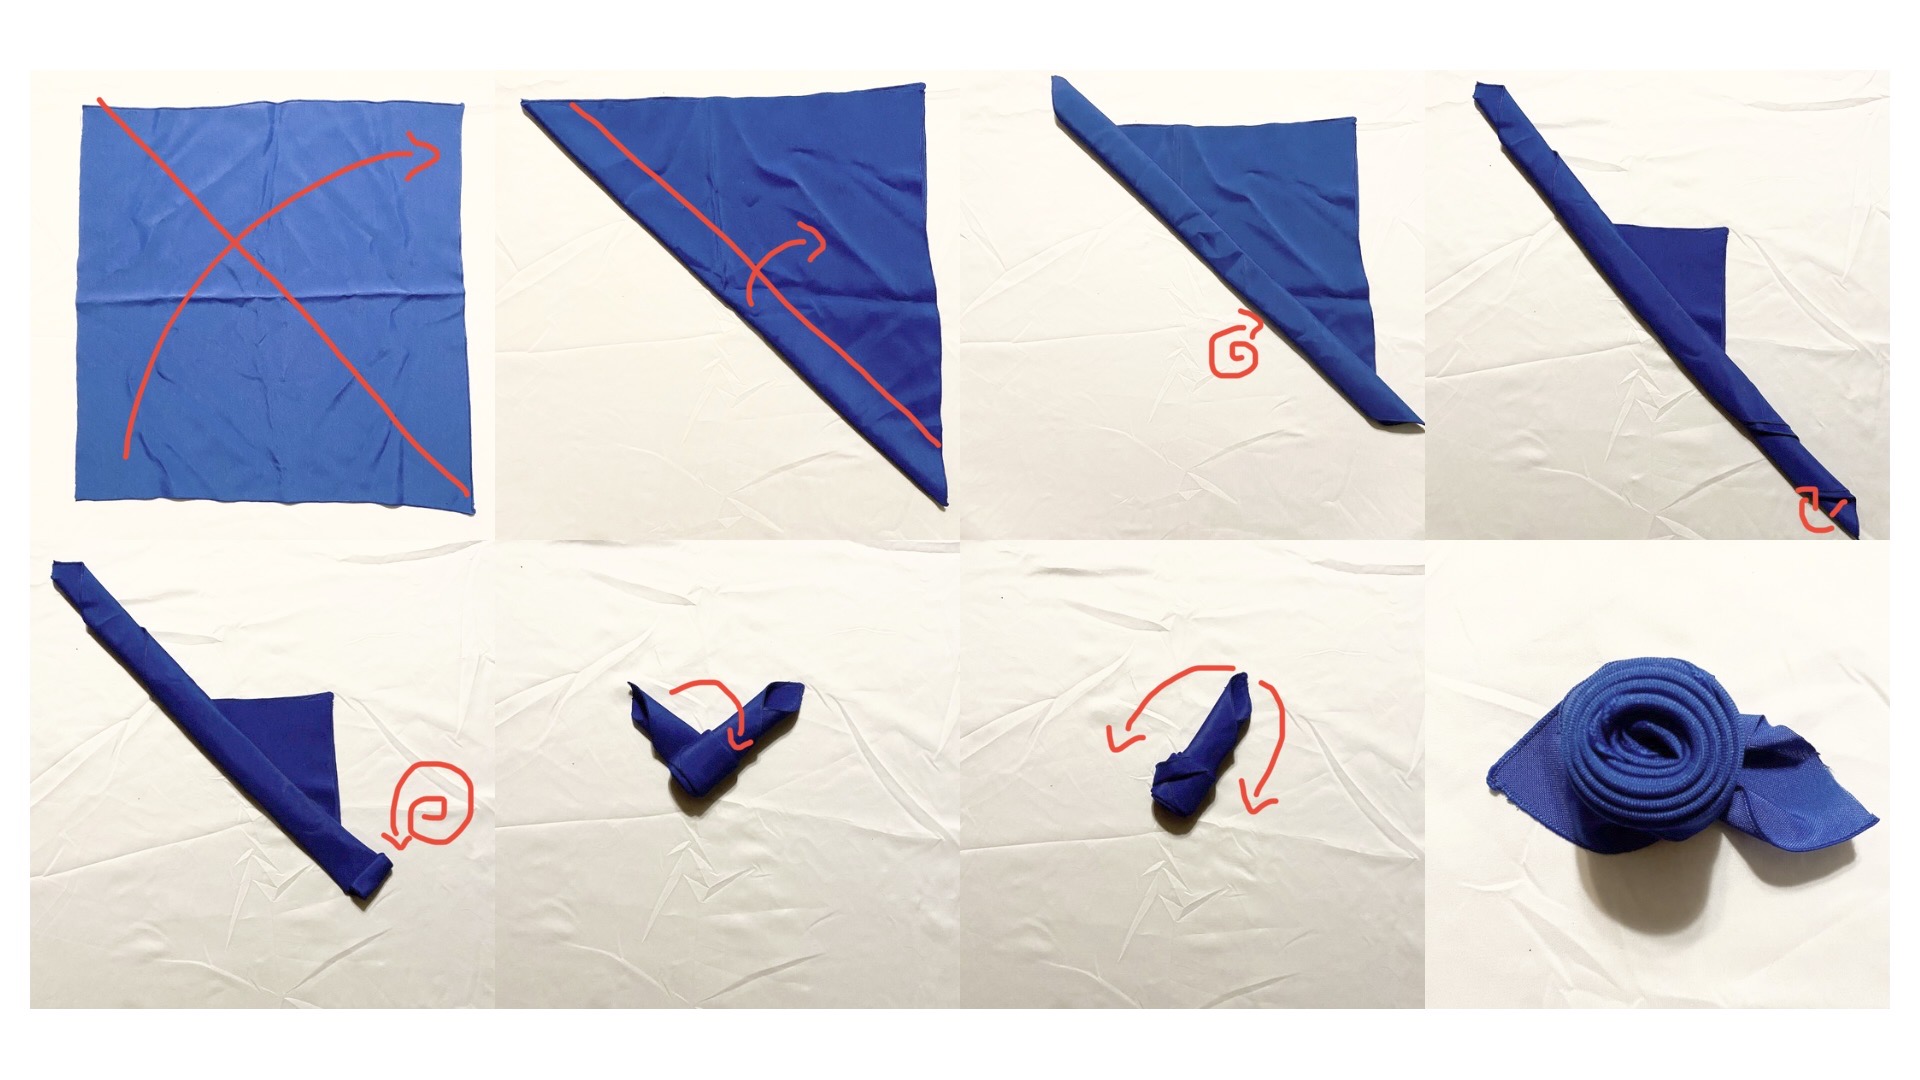
- Start by folding the napkin in half on the diagonal, creating a triangle.
- Starting from the folded edge, fold over about 2 inches of fabric, then continue to roll until about 3 inches from the opposite point, leaving a small triangle of fabric.
- From one end of the rolled strip you just created, tightly roll the napkin into a rosette.
- Tuck the tail end of the strip into the base of the rosette (the side with the triangle still poking out).
- Gently separate the two halves of the remaining triangle and pull them downward to create two leaves at the base of the rose.
Lotus
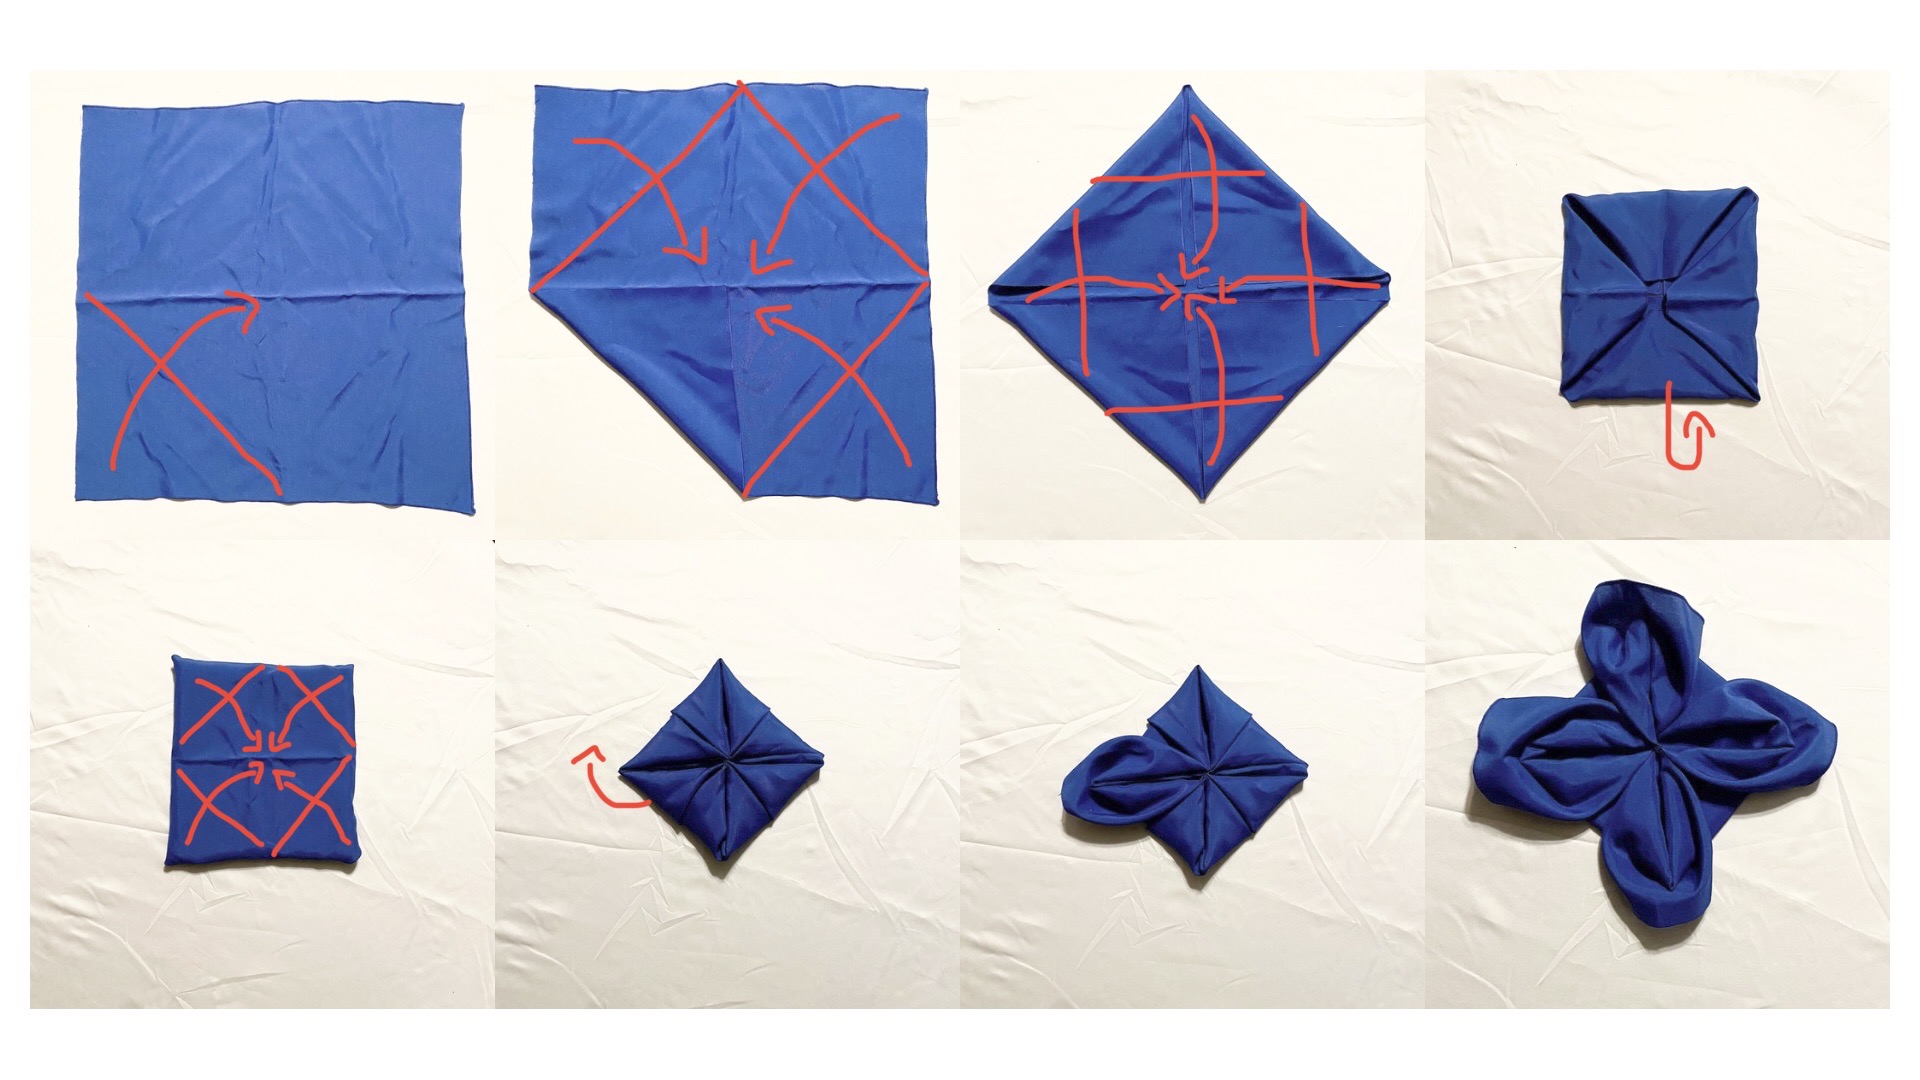
- Lay the napkin on a flat surface and fold each of the four corners into the middle, creating a diamond.
- Again, fold the new four corners you just created into the center, creating a square.
- With one hand holding the folded corners in place, flip the napkin over.
- For a third time, fold all four corners into the center.
- Gently reach under each new corner and flip the underneath triangles over and out to create the lotus petals (see diagram).
Pyramid
- Fold your napkin in half along the diagonal to create a triangle.
- Fold each of the side corners up to meet the central corner, creating a diamond shape with a line running through it.
- With the line running vertically, fold the diamond in half backwards along the diagonal.
- Fold the resulting triangle in half backwards along the central line.
- Stand the pyramid up along its long edge and adjust as needed for stability.
Bishop’s Hat
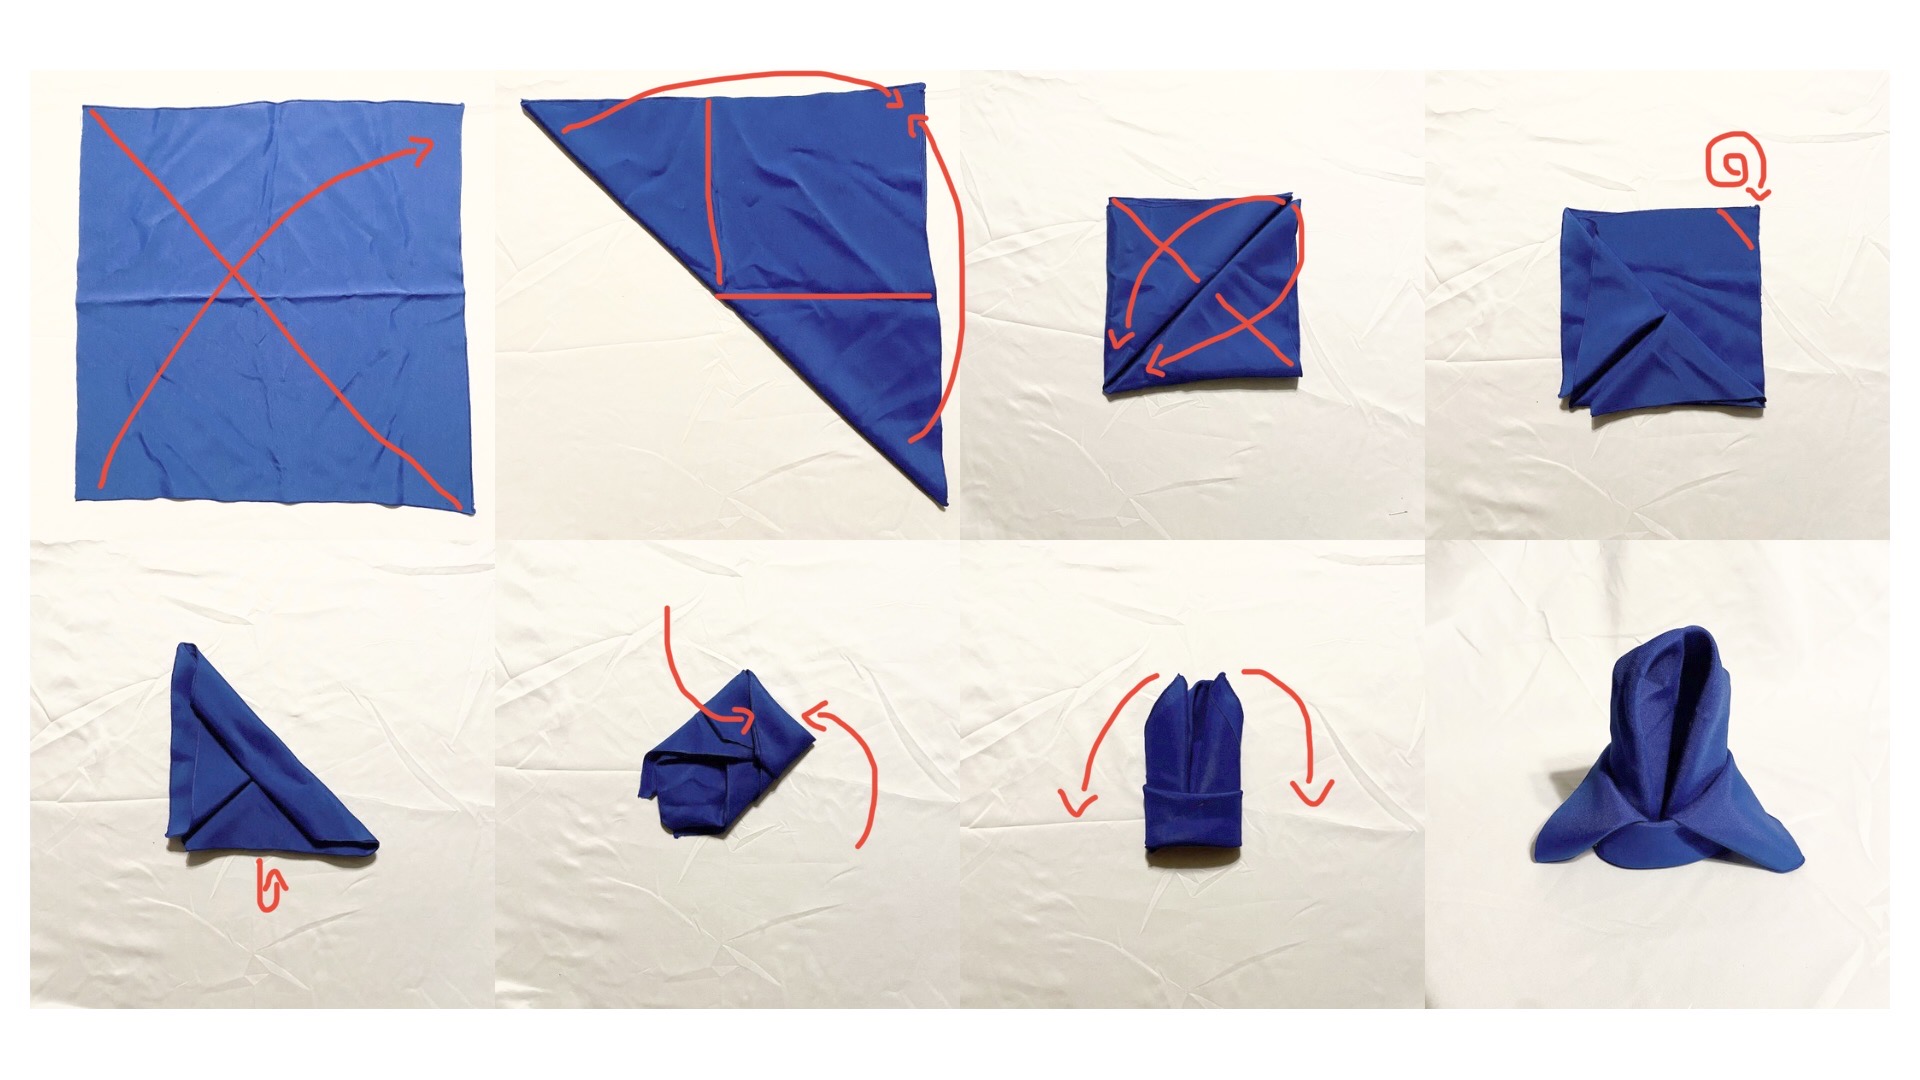
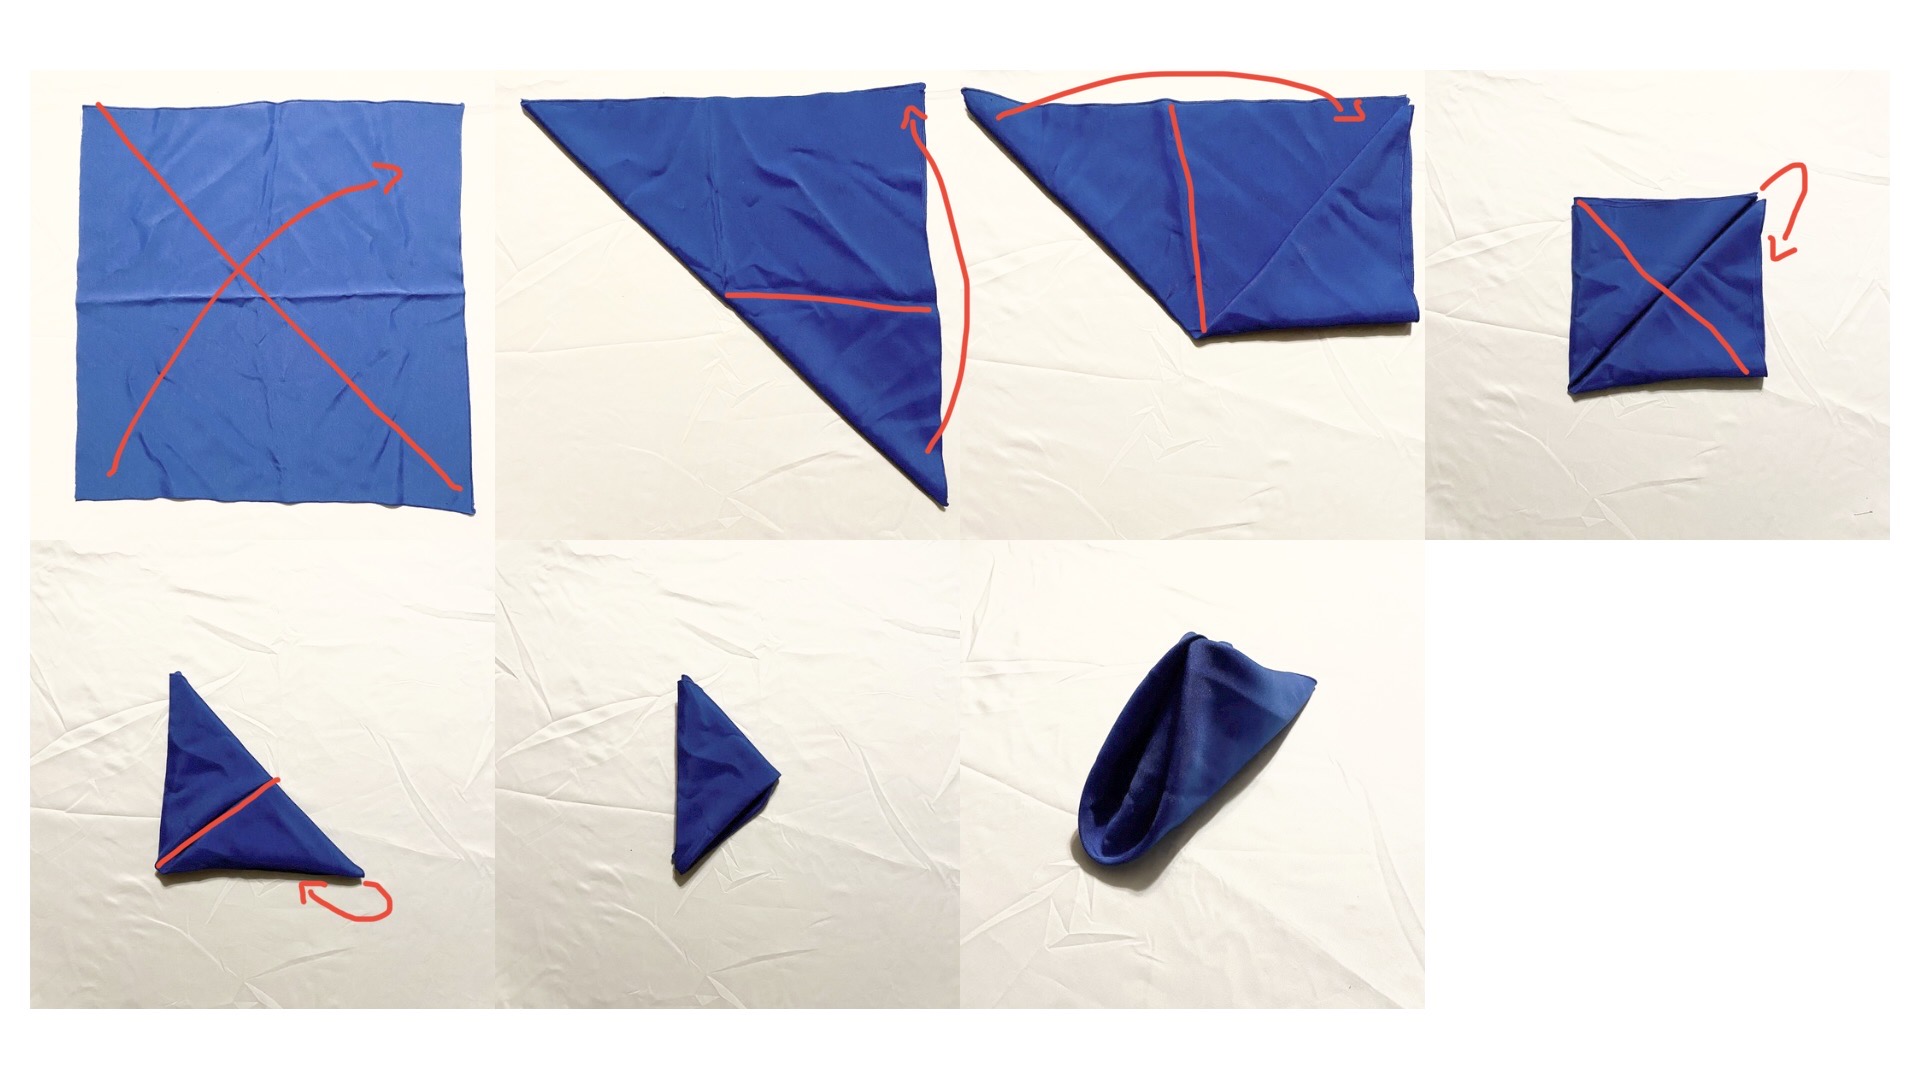
- Fold the napkin in half along the diagonal, creating a triangle.
- Fold each of the side corners up to meet the central corner, creating a diamond shape.
- Fold the two corners back along the diagonal to meet the opposite point.
- Fold over the tip of the uncovered triangle and roll it until it folds over the center line.
- Flip the napkin over and tuck one long corner into the other.
- Stand the napkin up on the round base you just created and fold the two front points downward to finish the bishop’s hat.
Crown
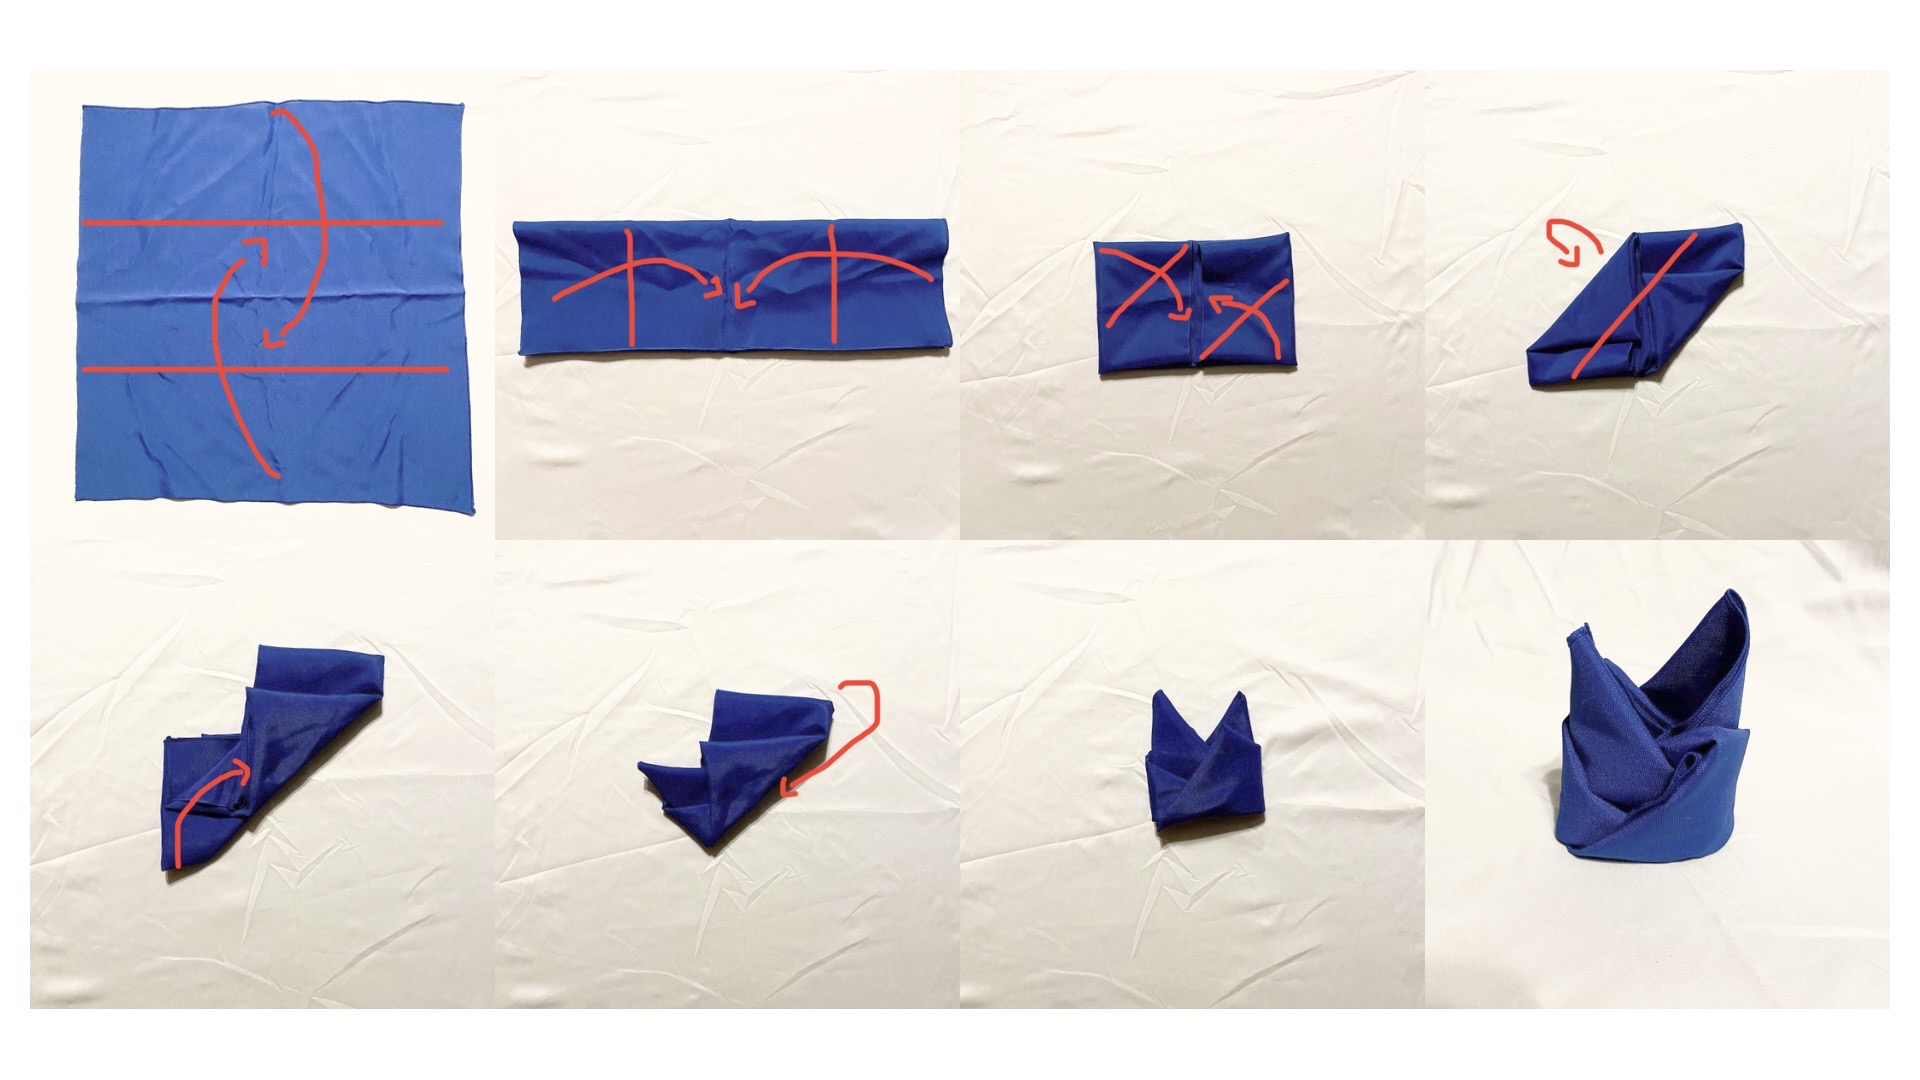
- With the napkin resting on a flat surface, fold the napkin in thirds.
- Fold the two ends of the resulting rectangle into the middle.
- Fold opposite corners toward the center, bottom and top edges meeting the middle line.
- Fold the shape in half backwards along the diagonal, leaving the two back triangles to stick up. (This is the trickiest part. Refer to the diagram to see where to fold and what the napkin should look like when folded correctly.)
- Fold the back corner toward the center and tuck it into the front triangle. Flip and repeat on the other side.
- Stand the napkin up on the flat edge with the points sticking up. Gently round the base for a sturdy hold.
Heart
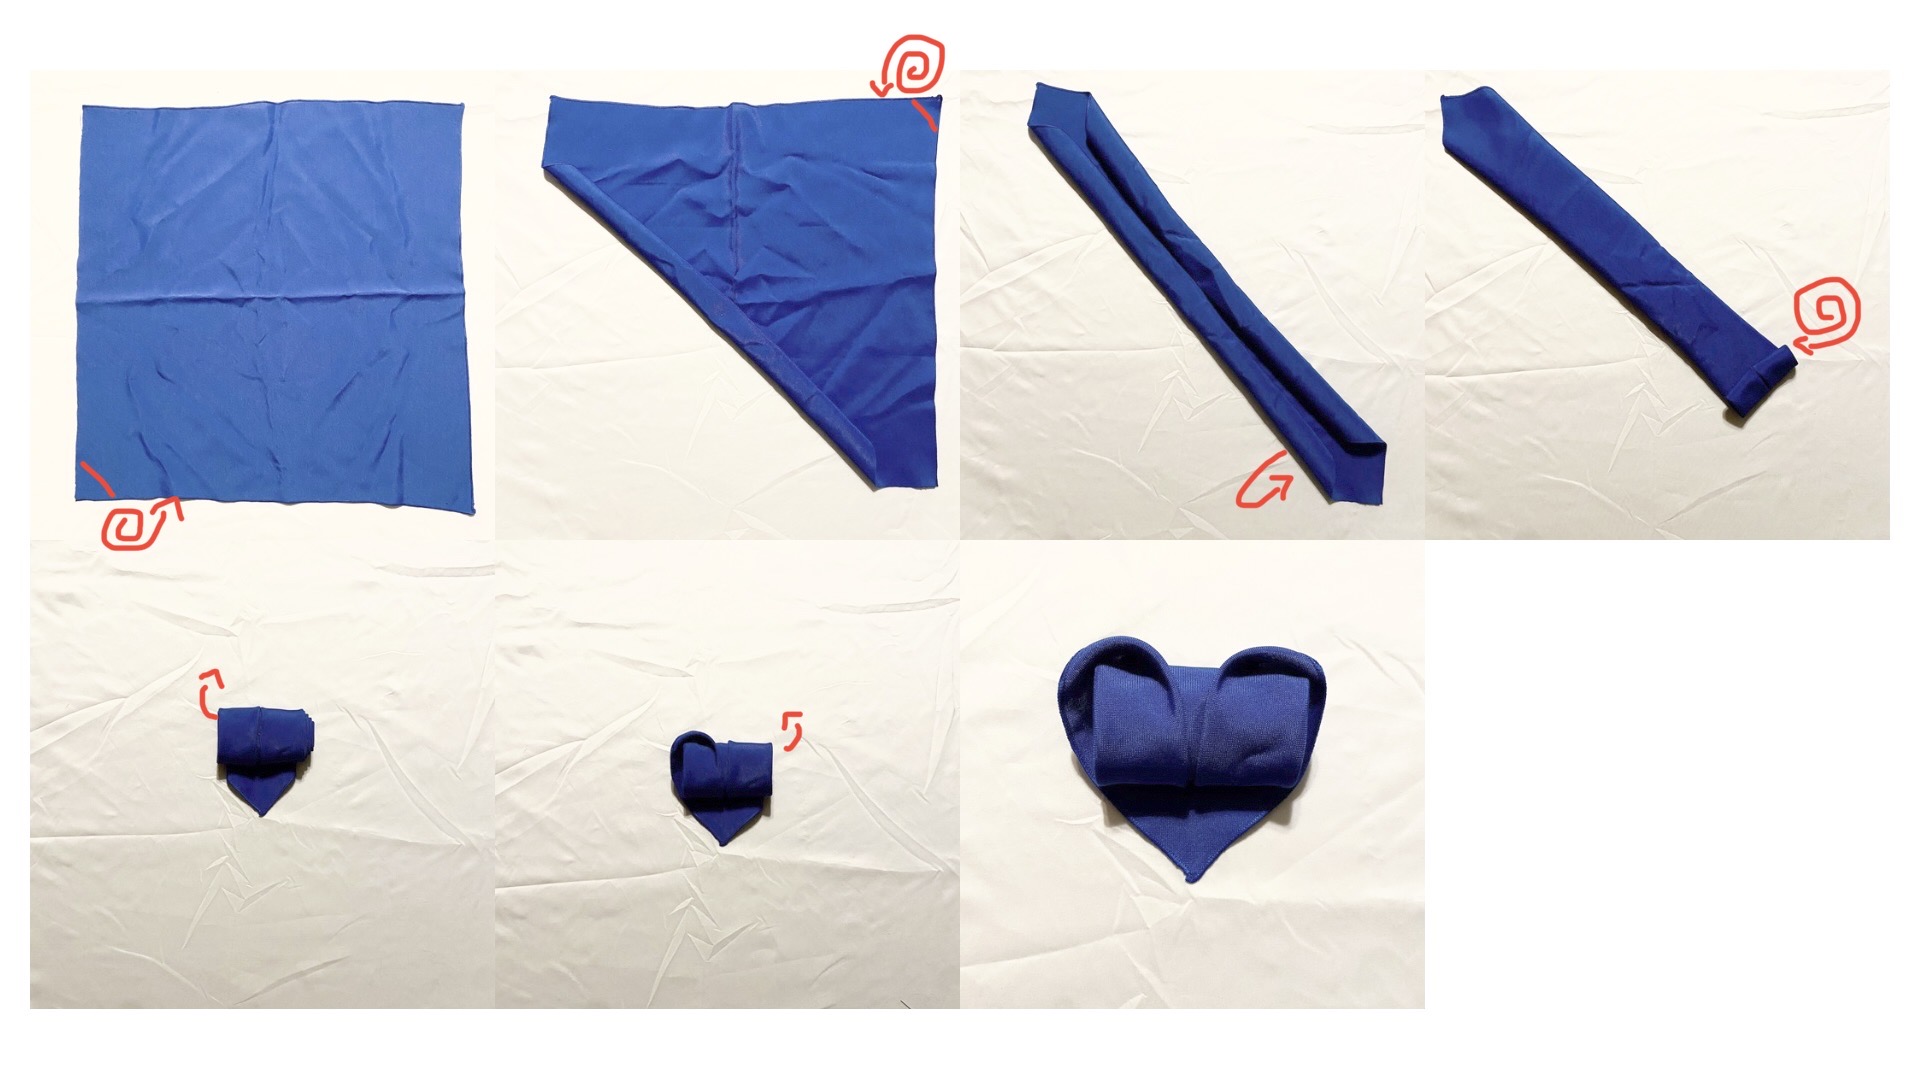
- With the napkin on a flat surface, roll opposite corners toward each other, meeting in the center. Keep the rolls as even as possible.
- Gently flip the piece over and tightly roll it from one end to the other, leaving a small triangle poking out from underneath.
- With the loose triangle pointing at you, gently flip the two sides out from the top of the roll, creating the two rounded bumps at the top of the heart.